With the Stripe Payments Plugin for WordPress, you have the capability to accept credit card payments for both physical and digital products seamlessly.
The Stripe Payments Plugin offers a convenient feature that allows you to create products effortlessly using a simple shortcode within a post or page. This flexibility empowers you to sell your products easily from any part of your website, enhancing the user experience.
The versatility and user-friendly nature of this plugin make it suitable for integration with any website, ensuring that you can effectively sell your products regardless of your site’s structure or layout.
Table of Contents
- Video Tutorial
- Installation and Basic Settings Configuration
- Creating a Product for Sale Using the Stripe Plugin
- Testing Your Product’s Buy Now Button
- What Happens After a Successful Transaction
- Embedding Products into a Post or Page
Video Tutorial
Installation and Basic Settings Configuration
Plugin Installation
Make sure you have downloaded and installed the most recent version of the Stripe Payment Plugin. After the installation, you will see a “Stripe Payments” tab in the sidebar of your website’s dashboard. If you don’t have a Stripe account yet, you will need to create one, and don’t worry, it’s free of charge.
General Settings Configuration
In order to effectively sell products, it is necessary to complete a few essential setup steps in the settings menu of the plugin, as outlined in the general settings configuration documentation.
In summary, follow these steps to complete the basic settings:
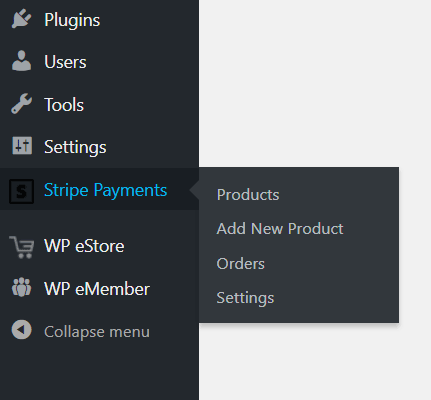
- Click on the ‘Stripe Payments’ tab.
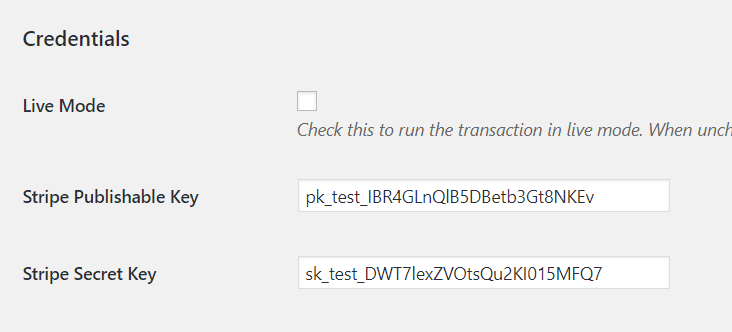
- Scroll down to the ‘Settings’ menu and locate the ‘Credentials’ section.
- If you want your site to go live, make sure to check the ‘Live Mode’ checkbox.
- Enter both your ‘Stripe Publishable Key’ and ‘Stripe Secret Key’ (you can find these in your Stripe account’s API menu field).
- Don’t forget to save your changes by clicking on the ‘Save Changes’ button.
Make sure that you have entered the correct currency and email address in the respective fields of the settings.
Creating a Product for Sale Using the Stripe Plugin
The following steps will guide you through the process of creating a new product in the plugin:
Step 1) Go to “Add New Product” link under the “Stripe Payments” menu.
Step 2) Add a product title and description (if you wish)

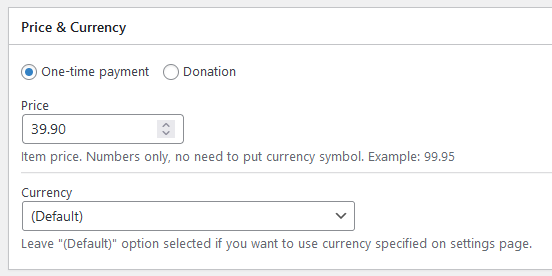
Step 3) Enter in the price of your item and ensure the currency is correct (default currency will use the selected currency in the Settings menu).
Step 4) If you are offering a downloadable item, upload the file under the Download URL field using the select file button or alternatively paste the URL of your downloadable file into the field.
Step 5) If you wish to add a product thumbnail and customize button text you can find these fields towards the bottom of the ‘Add New Product’
Step 6) Once you have filled in the product details make sure to save your product by clicking the Save or Publish button. The Publish button is in the right hand corner.
Your published products will then show in the ‘Products’ tab under Stripe Payments dashboard menu.
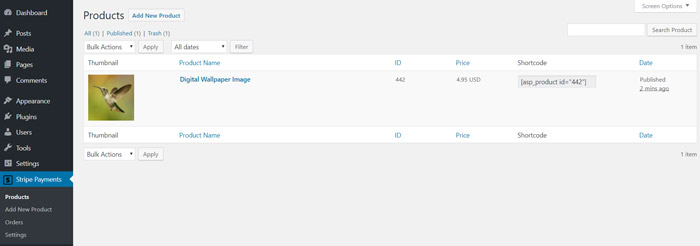
Your product’s shortcode can be found within the product details table. This shortcode can be copied and pasted into any post or page on your website where it will create a Stripe Buy Now button. Keep in mind, a page will be created automatically for your product once you publish your product also.
Testing Your Product’s Buy Now Button
For more detailed instructions on how to test a transaction, please refer to the testing documentation.
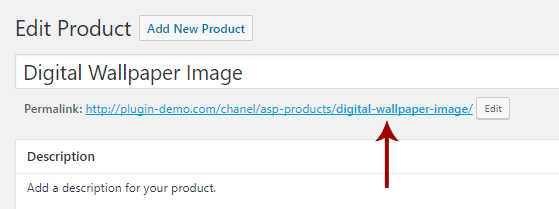
Step 1) Click on your created products ‘Permalink’.
Step 2) Your created product page will look similar to this test product below (depending on the details you have added in). This product page will have a buy now button that will enable your customers to pay for the item.

Step 3) Successful payments of a product will then show up under the ‘Orders’ menu of the plugin.
What Happens After a Successful Transaction
Upon a successful transaction, your customer will receive a thank you message containing the download link for the item if it is a digital product being sold.
As the site admin, you can view the customer’s order by accessing the Orders menu within the Stripe Payments plugin.
Embedding Products into a Post or Page
Once you create a product, you can put that product on any WordPress post or page. Simply use the shortcode of the product to put it on a page. You can also use the Stripe Payments block inserter to insert a product block. Read the embedding a product on a page tutorial to learn how to do that.