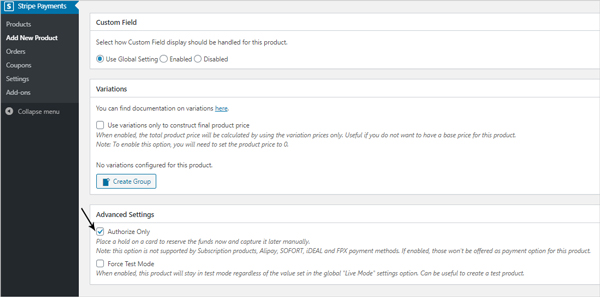
If you run a website where it makes sense to place a hold on funds before processing them entirely, the ‘Authorize Only‘ feature of the core Stripe Payments Plugin may be suitable for your eCommerce website.
This feature allows you to place a hold on a customer’s credit card in order to reserve the funds. This makes sense if you run a business where you wish to complete the transactions once the service or goods have been provided to the customer. Often businesses such as motels and hotels will use this model where the funds are charged/captured after the customer checks out to ensure that no additional funds for damages are required.
The ‘Authorize Only’ payment method is a manual way of processing a transaction. It gives the administrators of the website the control of holding funds on a card then capture the amount/charge at a later time.
How Does the Authorize Funds Feature Work?
If you wish to authorize funds prior to capturing them at a later time to suit your business model, the funds will be held by the bank for up to seven days. This allows the business seven days to provide the product or service and capture the funds and complete the transaction. Otherwise the transaction is cancelled and the funds are released back to the customer.
Enabling the ‘Authorize Only’ Feature for the Stripe Payments Plugin
To use this feature you will need to have the free Stripe Payments Plugin installed and activated on your WordPress website. Once this is complete you will be able to follow the steps below.
The ‘Authorize Only’ feature is enabled on a per-product basis. This allows you to create some products/services where funds will need to be authorized and the other products can be normal products.
- Click on the ‘Stripe Payments‘ menu and then the ‘Add New Product‘ menu item.
- Complete the product configuration as normal. Click here for more information on creating a product with the Stripe Payments Plugin.
- Towards the bottom of the product configuration page, you will see a section titled ‘Advanced Settings‘. Within this section, enable the ‘Authorize Only‘ checkbox.
- Click the ‘Publish‘ button to create the product.
- Now you can embed this product on a page.

Considerations When Using the Stripe Payments ‘Authorize Only’ Feature
If you intend to use this feature to authorize a payment before it is captured, please note the following:
- This feature does not work for subscription products
- This feature does not work for the following payment types: Alipay, SOFORT, iDEAL and FPX
Checking Out with an ‘Authorize Only’ Stripe Payments Product
Once your customer lands on the product page, they will be able to use the payment button just like any other payment button you have configured on your website although instead of the funds being automatically withdrawn immediately, it will go into a pending state. This pending state will be highlighted to the admin in the orders menu as ‘Authorized‘. The admin will have the option to then ‘Capture‘ it later.

Once the admin is ready to capture/charge the funds, the following will need to be completed:
- Click on the ‘Orders‘ menu of the plugin.
- For the transaction that is an ‘Authorize Only‘ product, you will see the words ‘Authorized‘ in the ‘Status‘ column.
- Click the ‘Capture‘ button for an ‘Authorize Only‘ transaction that you wish to process and complete. These steps are highlighted in the screenshot below.
