In a previous documentation for the Accept Stripe Payments plugin, we talked about how the product shortcode can be inserted into any post or page. Using the default shortcode will show your product description, thumbnail and a buy now button on the front end of your site that your customers can use to make a purchase.
In this documentation, we will look at how you can use a ‘Link URL‘ and attach it to either a text or image anchor to create a custom ‘Buy Now‘ button. This gives merchants the ability to have payment buttons that flow better with the aesthetics of their websites or use styled buttons that come with their theme.
Table of Contents
- When to Use Link URL to Create a Product Button
- How Can I Create a Custom ‘Buy Now’ Text Button?
- Applying a Coupon Code via URL
- Specifying a Default Quantity via URL
When to Use Link URL to Create a Product Button
There are a number of cases when the site administrators may want to create their own payment buttons rather than using the default shortcode that can be achieved by using the Stripe Payments plugin shortcode. Some administrators prefer to have a textual button that when the text is clicked it displays the payment popup for a product.
This link option can also be useful if you want to share it in email, text message, or social media channels.
How Can I Create a Custom ‘Buy Now’ Text Button?
Use the following steps to use a URL to facilitate the selling of your product or service:
Step 1) Create a product from the Stripe Payments ‘Products‘ menu. You can learn more about product creation here.
Step 2) Once you have ‘Published‘ the product, on the right-hand side of the product creation page you will see the ‘Embed Product‘ section.
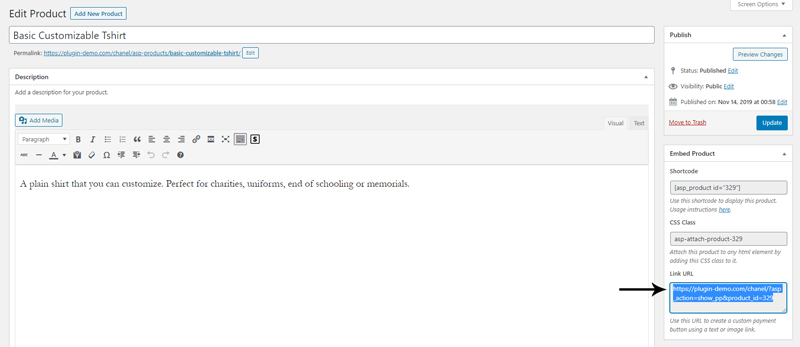
Step 3) You can copy the basic ‘Shortcode‘ and paste it on any WordPress page or post to display your product and a ‘Buy Now‘ button. If you wish to create your own ‘Buy Now‘ style button by either using an image or text as the anchor, you will need to copy the ‘Link URL‘ (see screenshot above). Each product has its own unique ‘Link URL‘ so make sure you copy the one for the product you wish to display.
Step 4) Now that you have the product’s Link URL copied, you will need to add this to an image or text as a Link.
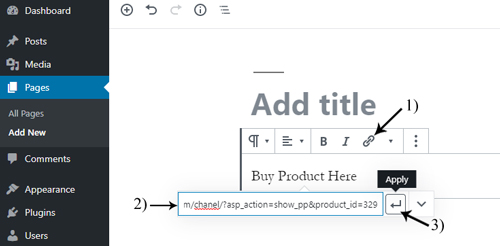
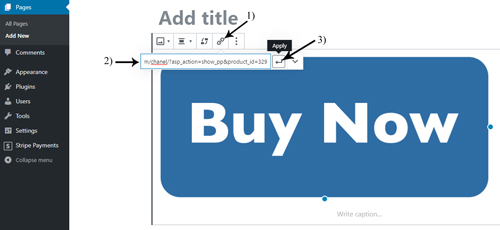
If you have an image that you wish to link the product to, you will need to paste the ‘Link URL‘ of the product in the ‘Insert Link‘ field and click ‘Apply‘ (see screenshot below).
Step 5) Now, you can go to the front end of your website and click on either your text or image link, then the Stripe checkout popup for that product will appear (see screenshot below).
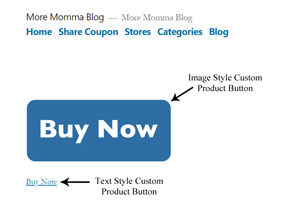
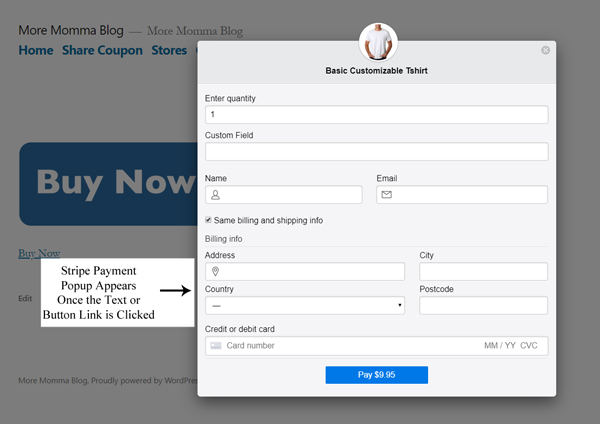
The customers will be able to complete the checkout for the product in question by providing their payment details.
Applying a Coupon Code via URL
You can directly apply a coupon code for users by incorporating the ‘coupon_code’ query parameter into the URL. This approach ensures that the coupon code is automatically applied within the payment popup window when a user visits the link.
Here’s how you can add the ‘coupon_code’ to this text-link/URL feature:
https://www.example.com/asp-payment-box/?product_id=8338&coupon_code=HALFOFF
Specifying a Default Quantity via URL
If you have enabled the “Allow users to specify quantity” option for a product, you can also predefine a default quantity using the URL. This allows the payment form to load with a preset quantity value. Customers can still adjust the quantity as needed before completing the purchase.
Here’s how you can add the ‘default_quantity’ to this text-link/URL feature:
https://www.example.com/asp-payment-box/?product_id=8338&default_quantity=3