If you are hosting a simple event, you can use the free Stripe Payments Plugin along with the Additional Custom Fields Addon to sell tickets online. How you then deliver the ticket/s to your customer is entirely up to you. Using Stripe Payments, you can choose to deliver an event ticket via email as a digital file, by using the receipt as proof of purchase or as a hard copy ticket by collecting their address.
What Type of Events Can I Sell Online with Stripe Payments?
While the Stripe Payments Plugin was not initially created for selling event tickets, all the basic functionality is there. Using the plugin and the Additional Custom Fields Addon, you can offer not only a variable event ticket, but also ask your customers any additional information that you may need. Using other features of the Stripe Payments Plugin, admin can set a maximum ticket quantity, apply tax and shipping costs and direct the customer to a thank you page after a successful purchase.
Some suitable events/tickets that can be sold using this plugin and addon online, include although are not limited to:
- Charity fundraisers
- Movie screenings
- Fun runs
- High teas
- Music concerts
- Plays
- Sporting events
- Market stalls
- Accommodation
Sending an Event Ticket Using Stripe Payments
Once you have created a basic Stripe Payments event (steps outlined in the next section), there are a number of ways you can choose to provide your customer/s with their ticket. The type of ticket your customer receives after they complete a successful purchase ultimately depends on what type of event you are hosting.
Option 1) Ticket via Digital Download
If you wish to provide your customers with a bright colorful ticket that outlines all the details of the event, you may choose to attach a digital file to the product you create. Ensure that the digital file you create can be easily printed so that your customer can bring it along to the event as proof of purchase.
Option 2) Receipt as Proof of Purchase
If you are taking the minimalist approach, you can notify your customers on the thank you page that the receipt they receive after a successful payment will act as their proof of ticket purchase. You may even like to direct them to print out their receipt and bring it along, or even show the digital version on their mobile at the gate entry.
Option 3) Collect Address to Send a Hard Copy Event Ticket
If you wish to send a ticket that is personalized for the customer, you may wish to collect their correct address (using the “Collect Address” option in the Edit Product Page) prior to purchase. Once you have their address, a hard copy ticket can then be delivered to them via post. This option works well for high priced ticket events that will be held later in the year.
Option 4) Online Event
If you are selling a ticket for an online event, you may wish to provide your customers with a secret passcode for an online portal. Some online events such as intellectual courses have tickets for sale in advance to ensure that certain numbers are met.

Creating a Basic Event with Stripe
Follow the instructions below to create your own event that customers can purchase tickets to online.
Step 1) Install and Setup the Stripe Payments Plugin and the Additional Custom Fields Addon.
Step 2) To create your event, click on the “Stripe Payments” menu and then click on “Add New Product“.
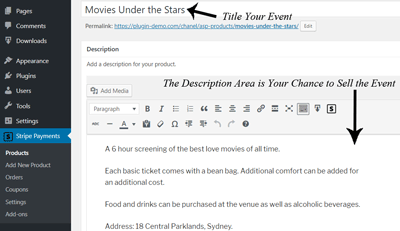
Step 3) Give your event a “title“. This will be displayed as the heading of your event.
Step 4) Outline the details of your event in the “description” field. This is where you can really ‘sell’ your event to potential customers. Don’t forget to mention in the description where the event will be held and what is included in the basic ticket price.
Step 5) Add the Price of a basic ticket to your event. In the next step we will look at how you can add variations which a customer can choose to ‘add on’ to the original price.
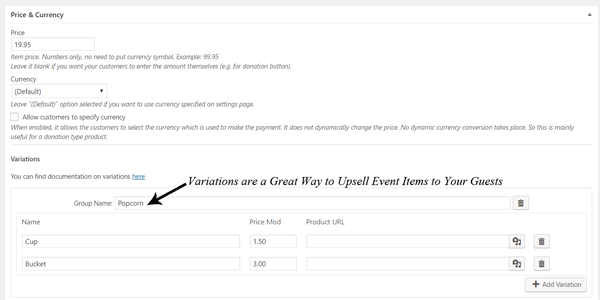
Step 6) Add price variations if it makes sense. For example, your basic ticket may be $19.95, although someone can add a popcorn for an additional $3.00. Alternatively, you can create a variation such as “Back Row Seating” that can subtract a set amount from the base price. Find out how to add variations to your event here.
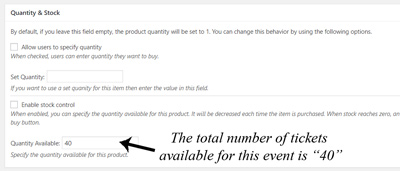
Step 7) If you wish to only offer a set amount of tickets to your event, type the total number of tickets you have available in the “Quantity Available” field.
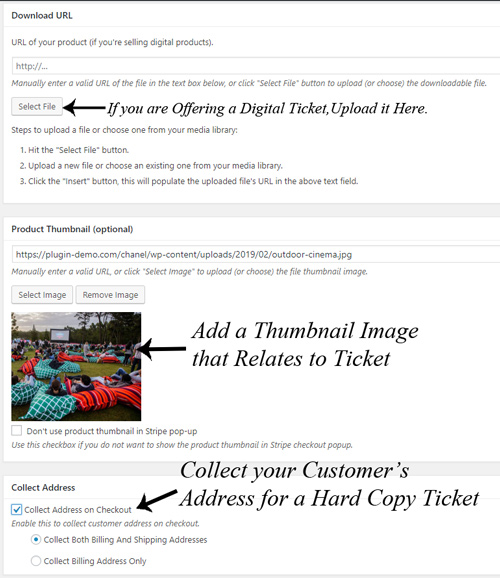
Step 8) If your customer will receive a digital ticket file after a successful purchase, attach your file by clicking the “Select File” button under the Download URL section. Alternatively, if you are choosing to send a hard copy ticket to your customer (outlined in Option 3) ensure you mark the Collect Address option.
Step 9) Add a “Product Thumbnail” that relates to the ticket you are selling. For example, a ticket for a movie screening may have an image of an outdoor cinema as the product thumbnail.
Step 10) Add “Tax” and “Shipping” costs if they apply to your ticket.
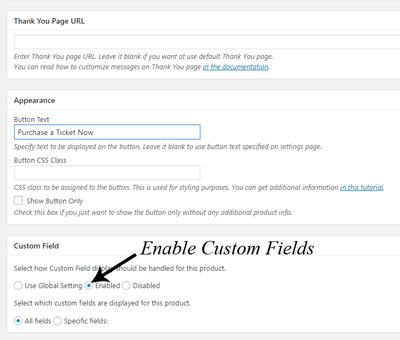
Step 11) Add a “Thank you Page URL” if your customer should be direct to a thank you page after a successful purchase. Edit the “Button Text” if you wish.
Step 12) Enable “Custom Fields“which we will take a look at creating in the next step.
Step 13) Save your product as a Draft for now until we configure custom fields. You can go back and Publish your product once the custom fields have been created and you wish to start selling tickets.
Step 14) Click on the “Stripe Payments” “Settings” menu. Choose the “Additional Custom Fields” tab.
Step 15) Create a number of custom fields that the customer will need to or should answer prior to making an event ticket purchase. For example, you may use the checkbox feature to ask your customer if they would like to sit at the front. Find out how to create custom fields here.
Step 16) “Save” your Custom Fields and then go back and “Publish” out your event tickets once you are ready!
Example Event Created with Stripe Payments

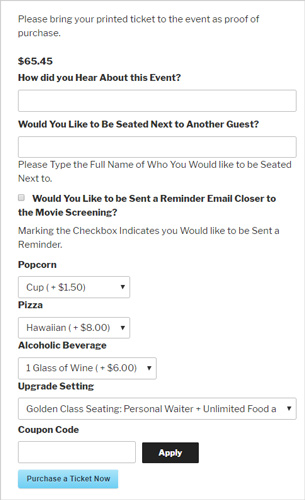
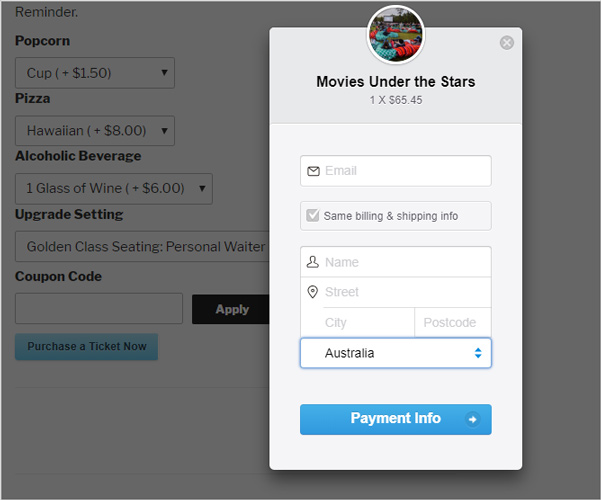
The above screenshots are of an example event that I created using the Stripe Payments Plugin and the Additional Custom Fields Addon. The event created is a basic movie screening event where the customer can purchase a ticket that will then be posted to them. The address used to post the ticket will be collected from the location they enter in the Stripe checkout popup window display below.
The basic movie event includes a couple of custom fields and some variations (add-ons) that the customer can choose from. If they have a coupon code for a discount they can enter this and then click the ‘Purchase a Ticket Now’ button. Their purchase will be processed with the Stripe payment gateway.
