After installing the plugin on your site, you’ll need to complete a quick and simple configuration.
Most of the default configuration values of the plugin will be good to get you going. You mainly need to enter your Stripe API keys into the settings menu of the plugin.
Table of Contents
- Obtaining Stripe API Keys (Test and Live)
- Rolling the Private Key
- Using Restricted API Keys
- Understanding Your Stripe Account Type
- Enabling CAPTCHA
Obtaining Stripe API Keys (Test and Live)
You will need to have a Stripe account to complete the general configuration of this plugin. If you do not yet have an account you will need to create one before proceeding.
- Go to the ‘Settings’ tab under the ‘Stripe Payments Plugin’ menu.
- Ensure the currency is correct.
- Half way down in the settings you will see a ‘Credentials’ section. Under this section you will need to enter in your Stripe API Keys. (These can be found in your API settings of your Stripe account).
- Tick the live mode box if you are ready to run live transactions.
- Save the changes you have made by clicking the ‘Save Changes’ button at the bottom of the settings page.
Example: API Keys in Stripe Account
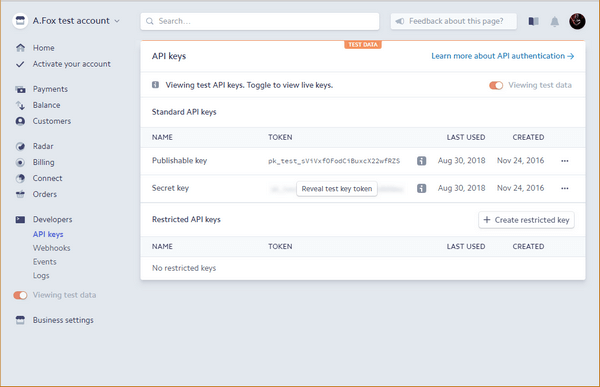
You can access this page from your Stripe Dashboard via Developers -> API Keys menu in the left column or by clicking here. Be sure to switch between Live and Test modes to see the corresponding API keys.
You need to copy and paste the “Test Mode” and “Live Mode” API Keys into the corresponding settings fields. Don’t mix them up. So make sure you are setting your Stripe account to “Test Mode” first then copy the test mode API Keys into the corresponding fields. Next, set the Stripe account to “Live Mode” and copy the API keys for live mode. If your Stripe account has not been approved for live transactions yet, then you may need to do this step at a later time.
Example: API Keys needed for configuration of Stripe Payments Plugin
Once you enter all the API Keys into the settings area, it should look something like the following:
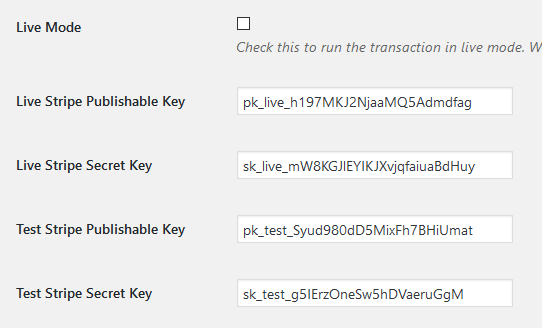
Make sure to save the changes after you are done.
Rolling the Private Key
If you have forgotten or misplaced your Stripe Private API Key, you can generate a new one by “rolling” the key in your Stripe Dashboard. Rolling a key will immediately deactivate the old key, so make sure to update it in your plugin settings to avoid service interruptions.
Steps to Roll the Private Key:
- Log in to your Stripe Dashboard at https://dashboard.stripe.com.
- Go to Developers → API Keys.
- Locate your existing key under the Secret keys section.
- Next to the key, click the “Roll key” option.
- Confirm the action — this will immediately disable the old key and generate a new one.
- Copy the new key once it’s generated.
- Paste the New Key into the appropriate API Key field in the plugin settings.
Important Notes on Rolling the Key:
- After rolling the key, any active connections using the old key will stop working.
- Make sure to update the key promptly in the plugin to avoid payment processing failures.
Using Restricted API Keys
To enhance security, you can use Restricted API Keys when configuring the Stripe Payments plugin. Restricted keys limit the permissions available to the plugin, reducing the risk of unauthorized access to sensitive data or actions.
Steps to Create and Use Restricted API Keys:
- Log in to your Stripe Dashboard at https://dashboard.stripe.com.
- Go to Developers → API Keys.
- Click Create Restricted Key.
- Set the following permissions for the key:
- Customers →
Write– Required to create and manage customer details. - Payment Intents →
Write– Required to process payments. - Setup Intents →
Write– Required for setting up payment methods. - Products →
Read– Required to read product details (if applicable). - Events →
Read– Required to monitor and process webhook events. - Subscriptions →
Write– Required if you’re using the Subscriptions addon.
- Customers →
- Once the key is created, copy the key.
- Paste the Restricted API Key into the appropriate API Key field in the plugin settings.
Important Notes on Restricted API Keys:
- If you face issues with certain features (like customer creation), ensure the necessary permissions are granted in the restricted key settings.
- For maximum security, avoid using Secret API Keys unless absolutely necessary.
- You can always modify the permissions for the restricted key from your Stripe Dashboard.
Understanding Your Stripe Account Type
Our ‘Accept Stripe Payments’ plugin integrates directly with Stripe, allowing you to process payments from your customers without intermediaries. You will create your own standard Stripe account, copy the API credentials, and input these details into our plugin’s configuration. However, if a previous plugin or platform set up your Stripe account, your account or existing API credentials may still be linked to that platform, potentially causing unexpected behavior. For more information, please refer to the following page:
Understanding Your Stripe Account Type
Enabling CAPTCHA
It is a good idea to enable the CAPTCHA option for your Stripe payment buttons. This will stop any spam bots from abusing your payment buttons.
Refer to the Captcha Options section of our documentation for details on the available options.
Read this documentation to learn how you can configure and enable the CAPTCHA option.