Let’s say you’re selling several eBooks and you want to have a customized thank you page for one of them. In this page I will show you how you can have a custom Thank You page and customize some of the message that is shown on that Thank You page.
Table of Contents
- What is a Thank You Page
- Example Thank You Page Output
- Important Note
- Product-Specific Thank You Page
- Specifying the Custom Thank You Page URL in the Buy Button Shortcode
- Customize the Message on the Thank You Page
- Tags That You Can Use
- Showing Any Error Message on the Thank You Page
- Thank You Message CSS Customization Example
What is a Thank You Page
The “Thank You” page is a standard WordPress Page on your site where the customers are sent to after they make a payment.
The Stripe Payments plugin creates this page when you first installed the plugin. This page is used to show the transaction result to your customers. They can also download the item from this page (in the case of a digital product). If you have deleted this page, you can use this documentation to recreate it.
Example Thank You Page Output
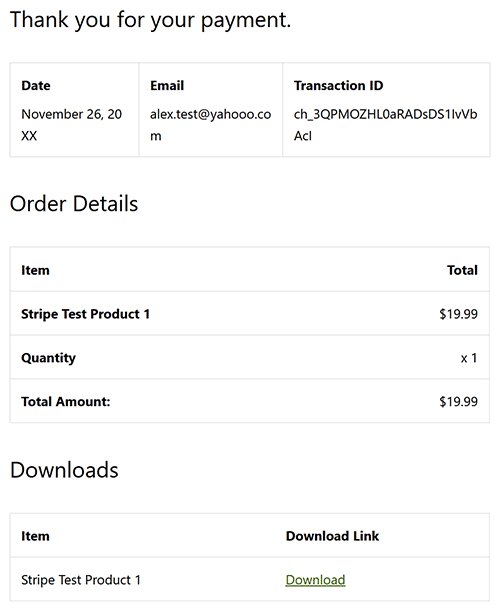
The screenshot below illustrates an example of the Thank You page output of this plugin:

If the product is a physical item and shipping address collection is enabled, the Thank You page output will also display the shipping address.
Important Note
Before customizing or modifying the ‘Thank You’ page, it’s recommended to test the plugin with a complete transaction. This ensures everything works as expected. Customization errors can disrupt the plugin’s transaction flow, so make changes incrementally and test thoroughly.
Product-Specific Thank You Page
If you’d like to redirect customers to a custom Thank You page for specific products to display tailored messages or instructions, follow these steps:
- Navigate to your admin dashboard and edit the product you wish to customize.
- Locate the “Thank You Page URL” field in the product configuration settings.
- Enter the URL of the Thank You page you want customers to be redirected to after their purchase.
This allows you to provide product-specific information or messaging directly on the Thank You page.
Specifying the Custom Thank You Page URL in the Buy Button Shortcode
If you want to use a custom “Thank You” page for your products, you can do that too. Create a new WordPress page and use the appropriate shortcode in the page to make your “Thank You” page. Then you can use that page’s URL in the Stripe buy button so the customer gets redirected to your custom thank you page after the payment.
Here is the shortcode to display a Stripe “Buy now” button for your product with a custom thank you page URL:
[asp_product id="5500" thankyou_page_url="https://example.com/custom-thank-you-page"]
Notice we have used “thankyou_page_url” parameter in the shortcode to specify our custom thank you page URL.
Following priority is used for thank you page:
- thankyou_page_url shortcode parameter;
- Thank You Page URL configured for the product;
- Checkout Result Page URL global setting.
Customize the Message on the Thank You Page
Now lets say you want to customize the message that is displayed on that page after a successful payment.
For this, you will need to enclose you custom message inside the [accept_stripe_payment_checkout] shortcode.
Below is an example of what you can put on your custom thank you page:
[accept_stripe_payment_checkout]

Thank you for purchasing the following item:

{item_name}

You paid {paid_amount} {currency_code}

<a href="{item_url}">Click here</a> to download the item.

[/accept_stripe_payment_checkout]
Those tags inside the brackets {} will be dynamically replaced with the data from the transaction.
Tags That You Can Use
You can use the following tags inside the shortcode to customize your message:
- {item_name}
- {item_url}
- {item_quantity}
- {item_price}
- {item_price_curr}
- {paid_amount}
- {paid_amount_curr}
- {tax}
- {tax_amt}
- {shipping_amt}
- {charge_date}
- {currency}
- {currency_code}
- {payer_email}
- {customer_name}
- {transaction_id}
- {coupon_code}
- {charge_description}
- {billing_address}
- {shipping_address}
- {custom_field}
- {custom_field_name}
- {custom_field_value}
Most of the email merge tags should also work on this Thank You page.
Showing Any Error Message on the Thank You Page
If the card transaction fails for some reason, then you can show the error message to the visitor by using the following shortcode in your thank you page.
If there were no error during the checkout, the content of this shortcode won’t be displayed.
[accept_stripe_payment_checkout_error]
There was an error with the credit card transaction. Error details below:
{error_msg}
[/accept_stripe_payment_checkout_error]
Thank You Message CSS Customization Example
Each row of the Thank You message output includes specific CSS classes. You can use these classes to target and customize the appearance with your own CSS styles.
This tutorial includes examples that can help you customize the appearance of the ‘Thank You’ message using CSS.