If you wish to offer your customers the option to checkout with Afterpay, you can achieve this by using the free Accept Stripe Payments Plugin and the Stripe Additional Payment Methods Addon. Afterpay is a widely used payment method that allows customers to buy an item and pay it off later.
In this tutorial, we will look at how you can set up ‘Afterpay’ for products that you create with the Stripe Payments Plugin.
What is Afterpay?
Afterpay is known for offering the Buy Now Pay Later payment option. It gives customers in the US, the UK, Australia, and New Zealand the option to pay for an item or service in 4 equal installments. The merchant receives the total amount upfront, while the customer pays off the item in 6 weeks.
Offering Afterpay to your customers may be worthwhile if you sell large ticketed items that may be hard for certain customers to afford upfront. Giving customers the choice of how they would like to pay, will only better your chances of a customer successfully completing the checkout on your website.

Offering Afterpay on Your WordPress Website
If you are using the Stripe Payments Plugin on your WordPress website it can be used alongside the Stripe Additional Payment Methods Addon to give your customers the option to pay with Afterpay. When Afterpay is selected, you will receive the total amount of the purchase (minus the Stripe transaction fees) upfront. The customer will then pay off their item over four equal installments.
Afterpay Configuration Steps
Step 1) Enable Afterpay in Your WordPress Dashboard
- You will need to purchase, install and activate the Stripe Additional Payment Methods Addon.
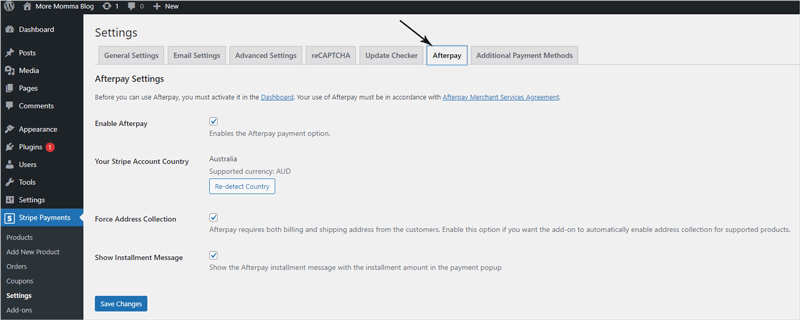
- Once this is activated, Afterpay can be setup from the Afterpay tab found by clicking on the Stripe Payments menu and then on ‘Settings‘. You will see the tab titled Afterpay within the settings menu.
- From the Afterpay tab, you will need to enable this option by marking the appropriate checkbox. Enable the ‘Force Address Collection‘ and ‘Show Installment Message‘ if those options are suitable for your website.
- Ensure you click the ‘Save Changes‘ button.
- If you haven’t already, make sure you have completed the settings from within the Additional Payment Methods tab.

Step 2) Enable Afterpay in Your Stripe Dashboard
If your business is eligible, you will be able to easily activate the ‘Afterpay’ payment option from your Stripe dashboard.

- Log into your Stripe Account Dashboard.
- Click on the Settings menu and then under the Payments section click on Payment Methods.
- You will see the Afterpay Clearpay option.
- Enable Afterpay in your Stripe account by completing the required steps for your business.
- Once you have enabled it in your Stripe dashboard, and completed step 1) which involved enabling ‘Afterpay’ within your WordPress dashboard, your customers should see the option when they proceed to checkout with an item or service you offer on your website.
Step 3) View Product to See the Afterpay Checkout Option
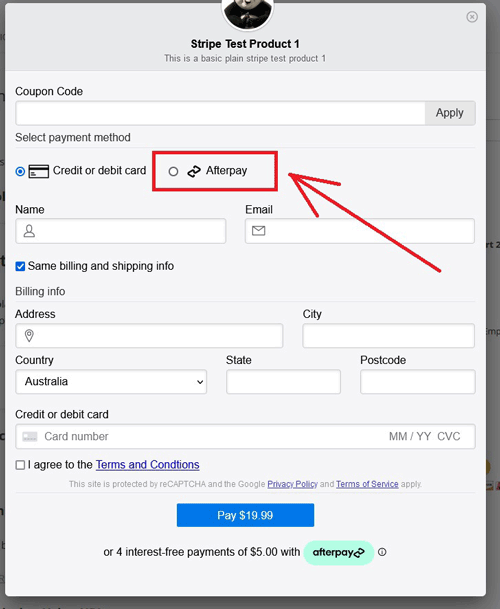
Once you have enabled ‘Afterpay’ in your Stripe Dashboard and within the ‘Afterpay’ tab in the plugin settings (inside WordPress dashboard), if you view a product you have created with the Stripe Payments Plugin from the front-end of your website and click the ‘Buy Now’ button, you will see the ‘Afterpay’ option (as long as you are residing in an eligible country). If you click this option, you can proceed to checkout with Afterpay. This will allow the purchase to be paid off in four equal payments.
The screenshot below shows where the ‘Afterpay’ option is located in the Stripe Payment checkout popup window.

Troubleshooting
Minimum Requirements
- The billing address collection must be enabled on the product for Afterpay to determine the buyer’s address, as they cannot provide the service without it. This documentation has details on how to enable address collection.
- To use the ‘Additional Payment Methods Addon’ your website must have an SSL certificate.
- Stripe supports afterpay in the United States, Canada, Australia, New Zealand, and the United Kingdom.
Click here to find out more or purchase the Stripe Additional Payment Methods Addon. This allows you to offer your customers the ability to checkout with Afterpay. When you have the ‘Stripe Additional Payment Methods Addon, you can also enable other payment methods such as Apple Pay, Pay with Google, and Microsoft Pay.