The Stripe Subscription Payments Addon gives you the ability to offer your customers subscription products and services. With this extension, you can easily manage recurring payments, ensuring a seamless and automated billing experience for your users.
Table of Contents
- Overview of the Stripe Subscription Payments Addon
- Example: A Gym Subscription Created Using the Stripe Subscription Payments Addon
- How will My Customers Pay for a Subscription?
- Get the Subscription Payments Addon
- Installation and Usage Instructions
- Step 1) Installation and Activation of the Addon
- Step 2) Settings Configuration
- Step 3) Creating a Subscription Plan
- Step 4) Adding the Subscription Plan to a Product
- Viewing Customer’s Subscription Details and Canceling a Subscription
- Handling Customer Credit Card Expiration and Customer Credit Card Details Update
- Pay What You Want for Subscription Payments
- Variable Products and Subscriptions
- Change or Update the Subscription Price of an Existing Product
- Get the Subscription Payments Addon
- Or Get the Addons Bundle
Overview of the Stripe Subscription Payments Addon
This addon uses the Stripe gateway to accept ongoing credit card payments from your customers in return for a product or service that you are providing. The recurring payments will be charged to your customers credit card automatically (after they complete the checkout of a subscription product).
The subscription options are endless using this addon. For example, you could offer a magazine subscription where a customer is charged $25.00 per month for one year. You can simply collect their shipping address when they originally purchase the product. Another subscription example would be offering weekly fitness tips for $19.95 a week for 3 months. You could use their email to send them these tips each week.
As site admin you have complete control of the plans you offer. The currency, subscription price amount, billing interval and duration are all completely customizable. The subscription plans you configure can then be linked to any product.
The ‘Trial Period’ feature gives your customers incentive to sign up to your subscription.
You can also create subscription plans for both test and live mode. This can be helpful if you want to test your subscription before going live.
Example: A Gym Subscription Created Using the Stripe Subscription Payments Addon
Customers who sign up to this subscription will be charged $59.95 per month for 12 months.

How will My Customers Pay for a Subscription?
As admin, you will configure a ‘Subscription Plan’ and then link this plan to a ‘Product’. When a customer lands on the product page they will see your ‘Pay Now’ button. In the example above the button has been customized to read ‘Join Now’. Once the customer reads the product details, they can click the payment button to proceed.
Clicking on the payment button will prompt them to enter their credit card details and click the ‘Pay’ button. After a successful payment you can specify a thank you page that they will land on. An email generated by the plugin will also be sent to the customer.
Get the Subscription Payments Addon
This is a one-time payment (includes 1 year of support and updates).
Installation and Usage Instructions
Step 1) Installation and Activation of the Addon
Once you have purchased this addon you will be able to install it straight onto your WordPress site.
- Click on the Add New menu under the plugins interface.
- Click on the Upload Plugin button and select the addon zip file.
- Hit the Install Now button and then activate the addon.
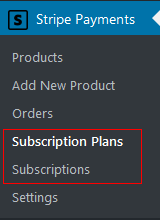
Once the addon has been activated you will notice two additional menus within the ‘Stripe Payments Plugin‘. These new menus are titled: ‘Subscription Plans‘ and ‘Subscriptions‘.
Step 2) Settings Configuration
Prior to creating a subscription, you will need to configure some simple settings that relate to the ‘Stripe Payments Subscription Addon‘. To configure the settings related to this addon you will need to have ‘access to‘ and ‘basic knowledge of‘ your Stripe account. Once you have completed the following configuration steps you will be ready to create your first subscription plan.
Locating the Stripe Subscription Settings Menu
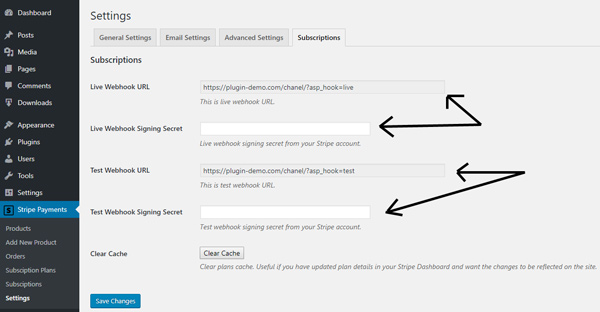
- Click on the ‘Settings‘ menu of the ‘Stripe Payments Plugin‘.
- Within the ‘Settings’ interface, click the ‘Subscriptions‘ tab.
- You will see a ‘Live Webhook URL’ and a ‘Test Webhook URL’ fields.
Live Mode Vs Test Mode
Please note that if you want to do test transactions then ALL your details (example: API keys, webhooks, subscription plans) need to be the test mode version. If you want to do live mode transactions then use the live mode details from your Stripe account. Do not mix them up. Some users copy the test mode API keys then use the live mode webhook then create a test mode subscription. That will just trigger an error from Stripe when you try to do a transaction.
Subscription plan modes are not interchangeable. So if you want to use subscriptions in test mode, then create everything in test mode (like a new subscription plan, then a new product for it). After your testing is done and you want to start using the live mode, you can then set the plugin to live mode and create everything in live mode again.
Tip for testing a transaction: you can set everything up in live mode. Create a subscription plan for $1 per month and use it to do a transaction test. After the transaction, you can cancel the subscription.
Make sure all the details are consistent for ONE mode (Live or Test). Don’t keep switching between the modes and mix them up.
Setting Up the Stripe Webhooks
You can setup the webhooks using one of the following two options. The automatic option is the easiest.
Option 1) Automatic Method (Recommended)
- Go to the Stripe Payments -> Settings interface.
- Click on the “Subscriptions” tab.
- Click “Create Webhook” button in “Live Webhook Status” section and wait for the addon to automatically create it for you.
- Do the same for “Test Webhook Status” section.
- Click “Save Changes”.
Option 2) Manual Method
If you have used the automatic option explained in Option 1, then skip this section.
- In a new browser tab, log in to your Stripe account.
- Note: If you are creating webhooks for test mode, make sure to switch to test mode in your Stripe account then create the webhooks. If you are doing it for live mode then switch your Stripe account to live mode then create the hooks.
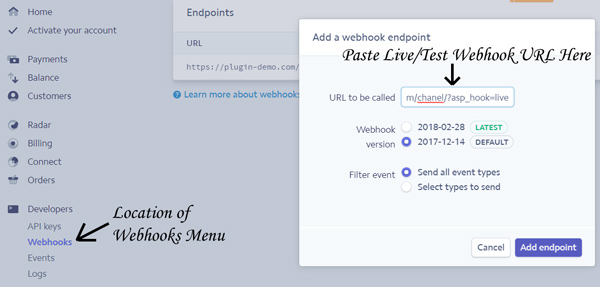
- Under the ‘Developers‘ menu in your Stripe account, click on the ‘Webhooks‘ tab. Alternatively, click here to be taken to the ‘Stripe Webhooks Page’.
- Click the ‘Add endpoint‘ button and create webhook endpoints for both your ‘Live’ and ‘Test’ webhooks. You will need to copy and paste the ‘Live Webhook URL‘ and the ‘Test Webhook URL‘ from the Stripe Payments Subscription Settings page.
- Once you have added both webhook endpoints you will need to ‘Reveal‘ the ‘Signing Secret‘.
- Copy and paste both of the ‘Signing Secret Webhooks‘ into the appropriate fields in the Stripe Plugin Subscription Settings. Ensure that you paste the ‘Live Webhook Signing Secret’ and the ‘Test Webhook Signing Secret’ into the correct fields.
- Save the Settings in the plugin.
Step 3) Creating a Subscription Plan
Once you have completed the first 2 steps you are ready to create your first subscription plan. The ‘Subscription Plan’ is basically a template with fields that you can customize to suit your product or service.
Locating the Subscription Plans Menu
- Click on the ‘Subscription Plans‘ tab under the ‘Stripe Payments‘ menu.
- Plans that you have previously created will be listed on this page.
- To create a new subscription plan, click the ‘Add New Plan‘ button.

Customizing the Subscription Plan
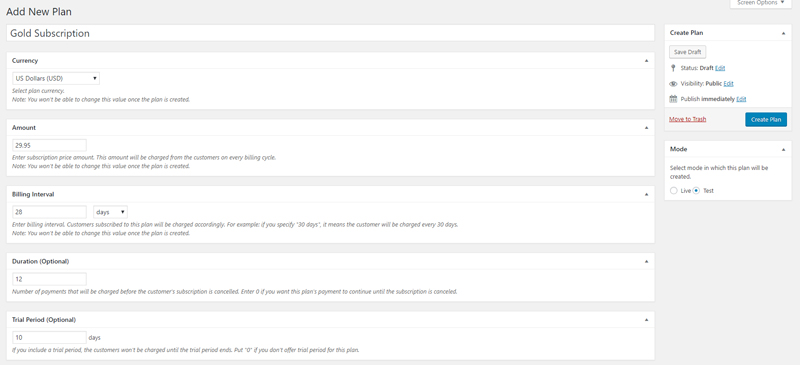
The subscription plan page contains multiple fields that you will need to fill in to create the plan. It is important to note that many details entered in these fields cannot be altered once the plan is created. You can always create new plans.
- You should start your plan by giving it a ‘Title‘. For example, you may choose to title your plan ‘Yearly Subscription’ or ‘Gold Subscription’.
- Choose the ‘Currency‘ of the plan you will be offering from the drop-down menu.
- Enter in an ‘Amount‘, ‘Billing Interval‘, ‘Duration (Optional)‘ for your Subscription Plan.
- Select either ‘Live’ or ‘Test’ from the ‘Mode‘ section on the far right of the page. This will decide how this subscription plan is offered. If this plan will only be used for testing purposes, choose ‘Test’ mode.
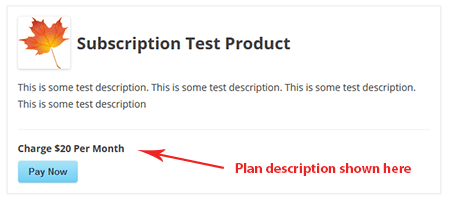
- You can use the ‘Plan Description for Product Display’ field to enter a description for the subscription plan. The visitors will see this text above the subscription button.
- Once you have completed all the fields, click the ‘Create Plan’ button.
Amount
This field requires a numeral that your customers will be charged each billing cycle. For example, if I wish to charge my customers $29.95 per month for one year I would enter 29.95 into this field. No currency symbols should be entered in this field.
Billing Interval
In this section you are required to specify a numeral and choose a period from the drop down menu. This will be the billing interval when your customers are charged for their subscription. For example, if you wish to charge your customers every 7 days, you would enter 7 in the field and choose the word ‘Days’ from the drop down menu. You can choose to charge your customers per day, week or month.
Duration (Optional)
This field is where you can enter the number of payments to be deducted before the subscription is canceled. If you wish for the subscription to continue until further notice enter ‘0’.
Trial Period (Optional) – Free or Paid Trial
The trial period settings allows you to offer your customers a number of days that they can use to test your products or services.
You can configure a free or a paid trial option for your subscription(s).
For example, if I wish to offer my customers the first 10 days of the subscription for free I would enter ’10’ into the ‘Trial Duration’ field.
For a paid trial, enter the amount you want to charge for the trial in the “Trial Setup Fee” field.
If you don’t wish to have a trial period enter ‘0’.
Plan Description for Product Display (Optional)
The plan description field can be used to show to your visitors what will be charged as part of this subscription. The description that you enter in this field will be visible above the subscription payment button on the front-end. You can leave this field empty to let the plugin generate and display a description of the subscription charge.
Step 4) Adding the Subscription Plan to a Product
Now that you have created a plan, you can add this to a product so your customer can pay for it.
- Click the ‘Add New Product‘ tab under the ‘Stripe Payments‘ menu.
- Configure the product as per usual. You can find out more on creating a product here.
- In the ‘Price and Currency‘ section is where you can apply a subscription plan to your product.
- By default, the ‘One-time Payment’ button will be selected. To choose ‘Subscription’ simply click the radio button for subscription payment.
- From the ‘Plan ID’ drop-down menu choose the plan you wish to apply to this product (if you have created multiple plans, you can select the one you want for this product).
- Click the ‘Publish’ button when you are done configuring the product.

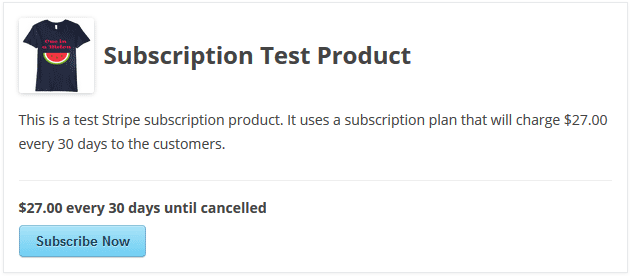
You have now created a subscription style product. You can direct your customers to this product page where they can checkout as per usual. This product will look like all other products although the terms of the subscription will appear above the payment button.
Viewing Customer’s Subscription Details and Canceling a Subscription
You can view the details relating to a customer’s subscription by clicking the ‘Subscriptions‘ tab under the ‘Stripe Payments‘ menu.
Viewing Subscription Details
Once you are in the ‘Subscriptions‘ page, you will see a list of customers who have or have had a subscription on your site. They will have an ID, a Status (active or inactive), a Subscription Plan, a Subscription Date and an Email. Clicking on the ‘View Details’ button next to a customer’s ‘ID’ allows you to view more details about that subscription as well as cancel the subscription if needed. You can search for a specific subscription using the ‘Search Subscriptions‘ field.

Canceling a Subscription
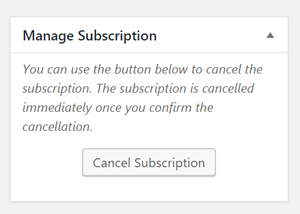
You can cancel a customer’s subscription by clicking on the ‘View Details’ button in the ID column. When you are in the ‘View Subscription’ page, in the right hand corner you will see a section titled ‘Manage Subscription’. Click the ‘Cancel Subscription’ button to terminate that subscription payment. Note that once you cancel a subscription it cannot be undone.
You can also allow your customers to cancel subscription as they need. There are several ways of doing this:
- Use {sub_cancel_url} email merge tag to send cancellation URL to the customer after product purchase.
- Use core plugin’s [asp_show_my_transactions] shortcode. Note this will only work if your customers need to login as WP users in order to make a purchase.
- Manually send your customer cancellation URL. You can find it in subscription details, “Cancellation URL” section:
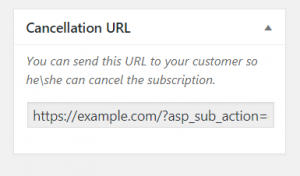
You can read the Canceling a Stripe Subscription tutorial to learn more on this topic.
Handling Customer Credit Card Expiration and Customer Credit Card Details Update
It is important to let your customers update their credit card (CC) details if they replaced the card or the card is expiring.
Enable Expiration Email Notification
Stripe sends a notice to the addon when your customer’s credit card is close to expiry. In order to notify the customer and let him update his CC on file, you can enable and configure expiry email notification.
This is what you need to do:
- Go to Stripe Payments -> Settings, Subscriptions tab.
- Scroll down to “Email Settings” section.
- Check “Send Email On CC Expire” checkbox.
- Configure email from address, subject and email body if needed.
- Click “Save Changes”.
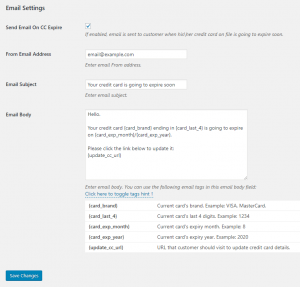
There is a couple of email merge tags you can use, most important is {update_cc_url}. It generates a personal URL for your customer which he can use to update credit card details.
Sending Credit Card Details Update URL Manually
If your customers want to update their credit card details, you can manually send them a personal CC details update URL for specific subscription.
This is how this can be done:
- Go to Stripe Payments -> Subscriptions.
- Find the subscription you want and click “View Details”.
- At the right column, you’ll see “Update CC Details URL” box. Copy the URL from it and send it to your customer.
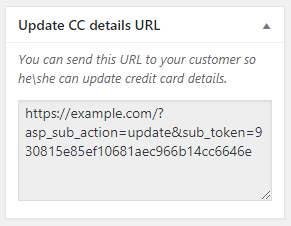
The Updating Customer’s Card Information tutorial has more information on this.
Pay What You Want for Subscription Payments
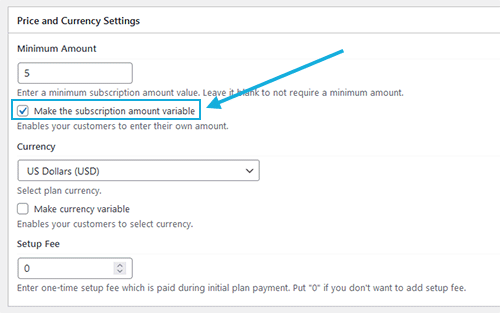
If you want to allow your customers to enter a custom amount for the subscription payments, then check the “Make the subscription amount variable” field. That enables your customers to enter their own amount for the subscription.
Variable Products and Subscriptions
Please note that subscription plans do not support variable product options due to some subscription API limitation at the moment
You can create multiple plans with the different price points and then offer them on a landing page. You can create as many product entries as you want to in our plugin and then embed them on your landing page.
For example: lets say that you want to offer a $30 per month option and then a $300 annual price option.
You can create one subscription plan for the $30 per month option and create a product for it. Then create another subscription plan for the $300 per year option and create another product for that. Embed both of these subscription products on your landing page. Your customers can then pay using the option they want.
Change or Update the Subscription Price of an Existing Product
When a customer signs up for a subscription, they agree to a specific pricing structure at checkout. The Stripe Subscription Payments Addon does not allow the price of an existing subscription plan to be altered without explicit customer consent. This ensures transparency and avoids unexpected charges.
If you need to update the pricing of an existing subscription product, follow these steps:
- Create a New Subscription Plan:
- Instead of modifying an existing plan, create a new subscription plan with the updated pricing.
- Keep the old plan unchanged to avoid disrupting current subscribers.
- Attach the New Plan to a Product:
- Associate the newly created subscription plan with a product in your store.
- This ensures that new customers will subscribe at the updated pricing.
- Use the Updated Product on Your Sales Page:
- Replace the old product with the new one on your website or sales page.
- All new customers will now purchase the subscription at the revised price.
What Happens to Existing Subscribers?
- Current subscribers remain on the old pricing plan. They will continue to be charged the original subscription rate unless they manually switch to the new plan.
- If you want existing customers to pay the new price, you will need to ask them to:
- Cancel their current subscription
- Sign up again under the new pricing plan
- This ensures they see and agree to the new pricing structure before proceeding.
By following this approach, you maintain a seamless transition for new and existing subscribers while ensuring compliance with Stripe’s pricing policies.
Get the Subscription Payments Addon
This is a one-time payment (includes 1 year of support and updates).
Or Get the Addons Bundle
Get access to all our premium addons for the Stripe Payments Plugin, auto-updates and guaranteed support. Click on the following banner to learn more.
