The Stripe Payments Plugin allows admin to create and offer variable products to their customers. These can be variable physical or digital products.
Admin have the ability to add as many variation blocks as they choose, each with a custom title. The variation options for a product are then displayed to the customer in a neat drop down menu.
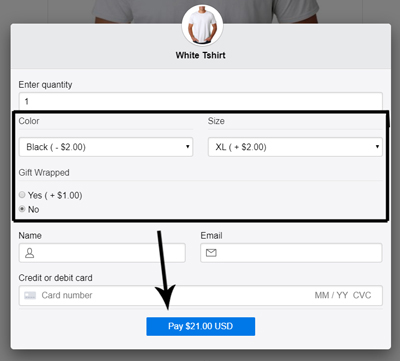
Each variation created for a product can have it’s own price modifier. For example, you may offer a basic white t-shirt for $10.00. If your customers choose this t-shirt in red, it will add an additional $2.00 to the total price while the black variation will minus $2.00 off the total. This example can be sighted in the screenshot below.
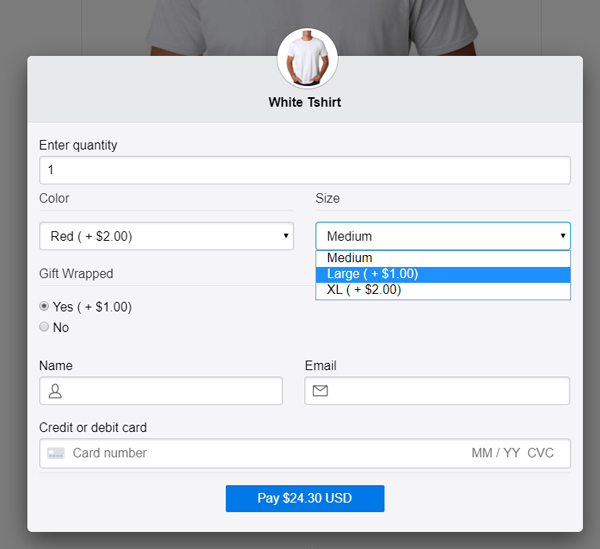
Table of Contents
- What is a Variable Product?
- Creating a Variable Product Using the Stripe Payments Plugin
- Definitions Relating to Variable Products
- How Can my Customers Checkout with a Variable Product?
- How Can I Add an Order Summary to my Stripe Checkout Popup Window?
- Adding Purchased Product’s Details to the Notification Email
What is a Variable Product?
If you wish to sell an item where there will be a number of sizes, colors or other variations to choose from, you will need to use a plugin that allows for variable products. The Stripe Payments Plugin allows for variations to be added to any product. The variation options will appear on the Stripe popup checkout window where your customer’s can make their selections.
Example of a Variable Product
You may wish to sell a basic t-shirt that comes in a number of colors and sizes. To achieve this, you would need to create a variable product.
In the following example, the customer can choose to purchase this t-shirt in one of the following colors: black, white or red.
They will then need to choose which size they would like to purchase: either small medium or large. The small size does not alter the total, although if the customer choose a medium t-shirt they will pay $1.00 more and a large shirt will cost $2.00 extra.
The total price of their t-shirt will depend on which variations they choose. A small shirt is $10.00, a medium shirt is $11.00 and a large shirt is $12.00.
Variations Displayed in a Drop-Down Menu
Your customers will need to choose the variation most suited to them from the drop-down menu. You can attach an additional cost to a variation in suitable cases.

Total Cost With Variations Applied
Once the customer has selected the variations of their product, the total cost will be altered according. The customer can then proceed to checkout as normal using the ‘Buy Now’ button.
Creating a Variable Product Using the Stripe Payments Plugin
Creating a variable product using the Stripe Payment Plugin is simple and easy. The variations feature of this plugin allows for a basic variable product that is either digital or physical.
Step 1) Ensure you have the Stripe Payments Plugin Installed and Activated on your WordPress site.
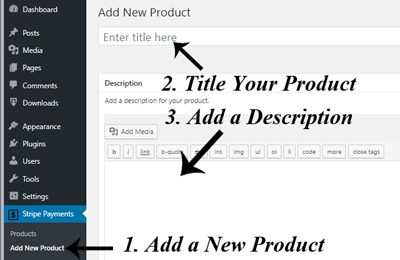
Step 2) Click on the Add New Product menu under Stripe Payments.
Step 3) You will now be on the Add New Product Page. You will need to give your product a title, a description and a base price along with other fields that make sense for your product.
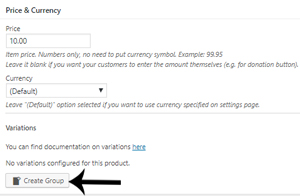
Step 4) Under the Price & Currency section you will see an option to Create Group. Click this button to create your first product variation group.
Step 5) You will need to give your variation a Group Name. The group name should represent what the customer is choosing. For example, this may be ‘Size‘, ‘Color‘, ‘Resolution‘, ‘Quality‘ or ‘Style‘.
Step 6) Click the Add Variation button.

Step 7) Enter a Name for your variation. This should relate to the Group Name. Your variations Name could be red, blue or green for a Group titled Color.
Step 8) Enter a numeral in the Price Mod field if you wish for this variation to have an impact on the overall price of the item. For example, enter ‘+1’ if you wish for this price to add one ‘dollar’ (or similar depending on the currency) to your product price or enter ‘-1’ if you wish to minus one ‘dollar’ from the product price.
Step 9) If this variation gives the customer access to a digital file, this file can be included by selecting a file using the media button.
Step 10) Add an additional variation to this group by clicking the Add Variation button.

Step 11) If you wish to create an entirely new group, click the Create Group button. It makes sense for each group to have a number of different variations.
Step 12) If you need to delete a group or individual variation, click the garbage bin icon.
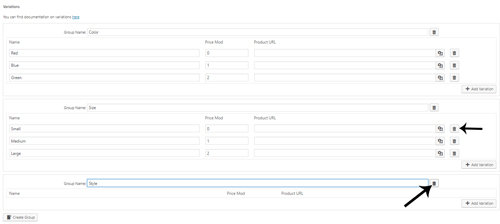
Step 12) Fill in any other fields that relate to your product on this page.
Step 13) Click the Publish button once you are ready for your product to go live.
Definitions Relating to Variable Products
Variation: A different option that is applied to the main product/service. This may alter/vary the product/service.
Base Price: This will be the starting point of the product’s price.
Variation Group Name: Lets the customers know what the variation will relate to. For example, ‘Color’ lets the customer know that choosing one of the variation options will alter the color of the item.
Variation Name: The title of the specific variation. For example, ‘red’, ‘blue’ or ‘green’.
Price Mod: Entering ‘+ and a numeral’ or ‘- and a numeral’ allows a variation to alter the overall price of the product if chosen by your customers.
Product URL: This URL will be supplied to customers that choose the variation it is linked to.
Garbage Bin Icon: Allows admin to delete single variations or entire variation groups.
How Can my Customers Checkout with a Variable Product?
Once you publish a variable product your customers will be able to select variations that appeal to them and then click the ‘Buy Now’ button to checkout.
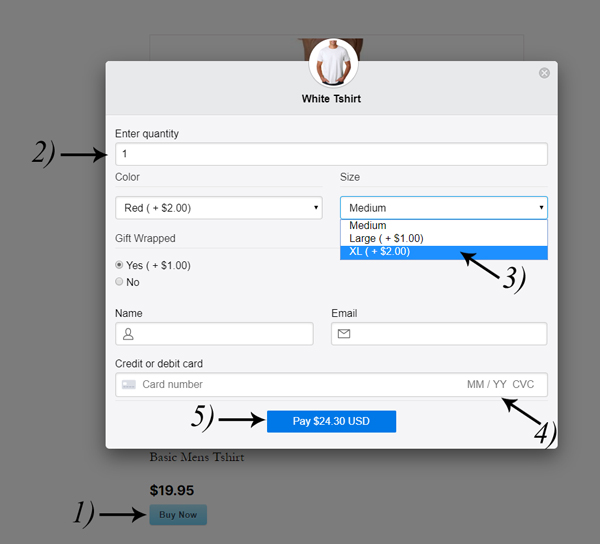
Step 1) Your customer will land on your variable product page.
Step 2) They will click the ‘Buy Now‘ button for the product.
Step 3) The popup checkout window will appear where they can choose the variations from your drop-down/radio button groups that suit them. Only one variation from each group can be selected.
Step 4) Once your customer has selected their variations, they can click the ‘Buy Now‘ button to checkout as normal. If they have selected any variations with price modifiers, these additional costs will be represented in the total of the product. The total of the product dynamically changes as the customer chooses different variations.
How Can I Add an Order Summary to my Stripe Checkout Popup Window?
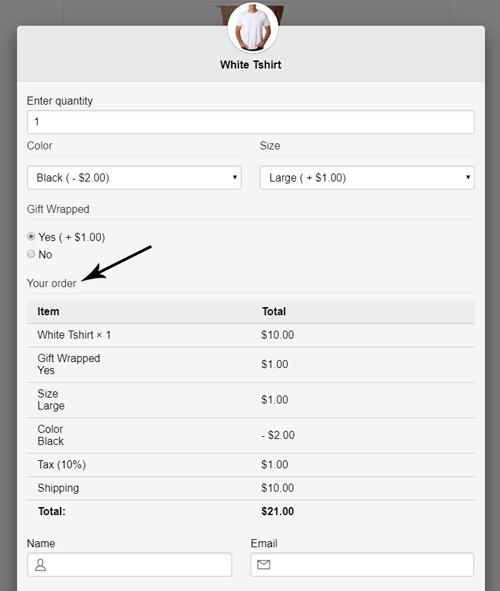
When you create a product with many variations, it makes sense to include a summary of the payment breakdown within the Stripe Popup window. This can be enabled on a per product basis, meaning you can simply enable this feature for those products that are ‘complex’.
If you wish to enable this feature that will show an order summary within the checkout window (similar to what is shown in the screenshot below) have a read of the following documentation.
Use Variations Only to Construct Final Product Price
By default, the final price of a product is calculated by adding the variation prices (if any) to the main product price. You can enable the “Use variations only to construct final product price” option to alter that behavior so the final product price is calculated based on the variation prices only. This can be helpful if you don’t want to set a base price for the product.
Please note that in order to enable this option, you’ll need to set the product price to 0.
Hiding Base Item Price of $0 in Order Summary Table
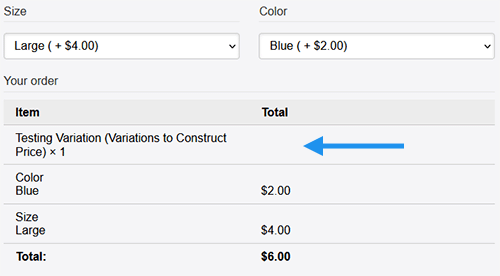
If you are using the Use variations only to construct final product price option and the base product price is set to $0. Then you may want to hide that $0 base price in the “Order Summary” table. So the customers will only see the variation prices and the total (after they select variations).
You can use a CSS tweak to accomplish this. Do the following steps:
- Go to the Settings -> Advanced Settings interface in the plugin.
- Add the following CSS tweak to the “Payment Popup Additional CSS” field:
#order-item-price {
  display: none;
}
The following screenshot shows an example of how it should look when the base price is hidden.
Adding Purchased Product’s Details to the Notification Email
You can use the following email merge tag to add the details of the product and the variation that the customer purchased.
{product_details}
This email merge tag will add details of the purchased product (including the variation selected by the customer) to the sale notification email.
The following is an example output of what information is included in this tag. In this example, the variation choices are: “Size”, “Download Link”, “Gift Wrapping”.
Product Name: Stripe Variation Product Test
Quantity: 1
Item Price: $25.00
Size - Medium: $5.00
Download Link - High Res: $0.00
Gift Wrapping - Yes: $5.00
--------------------------------
Total Amount: $35.00