The ‘Stripe Payments Additional Custom Fields Addon’ allows you to collect information from your customers before they proceed to checkout. Admin can create checkboxes, text fields, date pickers or dropdowns where they can ask one or a series of questions to the customer. The questions that are required can be marked as required which ensures your customers provide you with an answer.
All information supplied by the customers using the custom fields is then stored in the Orders menu. Admin can access this information at any time.
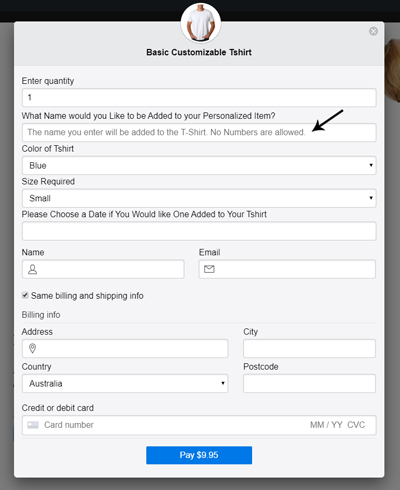
The additional custom fields will show up in the Stripe popup when the customer clicks the ‘Buy Now’ (payment) button. They can then fill in the fields prior to clicking the ‘Pay’ button.
Table of Contents
- Cases when the Additional Custom Fields Addon Should be Used
- Installation and Activation of the Addon
- Configuring the Additional Custom Fields Addon
- Viewing the Custom Fields Data in Your Stripe Account
- Adding Custom Fields Data to the Email and Thank You page
- Reorder or Rearrange the Custom Fields
- Configure Custom Fields Display Below Card Input Section
- FAQ’s for the Stripe Payments Additional Custom Fields Addon
- Purchase the Stripe Payments Additional Custom Fields Addon
- Or Get the Addons Bundle
Cases when the Additional Custom Fields Addon Should be Used
If you wish to ask your customers more than one question before they complete a payment for goods or services on your site, you will need the ‘Stripe Payments Additional Custom Fields Addon’.
Some questions that you may need to ask your customers include although are not limited to the following:
- ‘Where did you hear about our product/service?’
- ‘Do you require a tax invoice – yes or no?’
- ‘What name should be displayed on your personalized item?’
- ‘Are you purchasing this product as a gift?’
- ‘Please provide your email if you would like us to send you discounts in the future.’
- ‘Which Color Tshirt Would You like to Purchase?’
The questions you ask your customers using this addon may be specific to your products/services or about your company in general.
Installation and Activation of the Addon
Take the following steps to install this addon:
- Click on the Add New menu under the plugins interface.
- Click on the Upload Plugin button and select the addon’s zip file.
- Hit the Install Now button and then activate the addon.
Configuring the Additional Custom Fields Addon
1) Creating Custom Fields for your Stripe Payment Products
Step 1) Ensure you have Downloaded the addon and installed and activated it on your WordPress site.
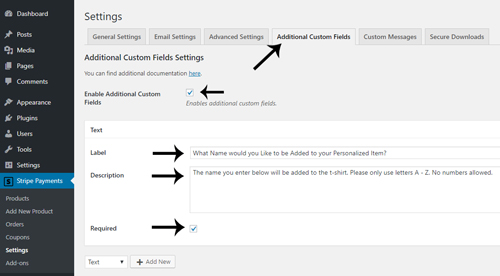
Step 2) Once the addon is active, you will notice a new tab under your Stripe Payments Settings menu. The new tab will be titled Additional Custom Fields.
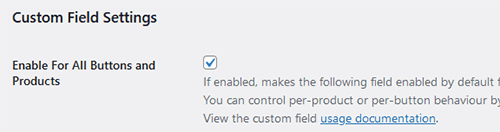
Step 3) Before configuring the addon, enable the custom fields option in the core plugin’s advanced settings. This enables the custom fields architecture that the addon can use.
Go to the following interface:
Settings -> Advanced Settings
Check the Enable For All Buttons and Products checkbox and save the settings. The rest of the fields in that section doesn’t matter since you will use the addon.
Step 4) Now you can start configuring the custom fields from the Additional Custom Fields tab of the settings menu.
Check the Enable Additional Custom Fields checkbox. The fields you add will then be displayed on each product where the global settings for Custom Fields is enabled. You can disable the custom fields on a per-product basis (see instructions below).
Step 5) Choose what type of field you wish to add: A Text Box, A Date Picker, A Drop-down or A Checkbox.

A text box will allow your customers to answer using text while a checkbox will allow your customers to answer by marking a checkbox. If the customer marks the checkbox, it shows they agree/want what you are asking.
A date-picker allows the customer to select a day from a range of days/months/years that you have specified and a dropdown allows the customer to select between a number of options.
Step 6) Click the Add New button. You will see a New Custom Input Box.
Step 7) Add a Label for your field and a Description. If this field is mandatory, mark the Required Checkbox. This ensures your customers cannot checkout until they have provided an answer.
The Label will be the title of the field while the Description will be displayed within the field. The description should give your customers ‘hints’ or further information on how they can answer the custom field. It should not be too lengthy.
Step 8) Once you have entered in the information for your new custom field, click the Save Changes button. Use the arrows to decide the order they should be listed in on the products page (if you have more than one custom field). Clicking the Garbage Bin icon, will delete that specific custom field.

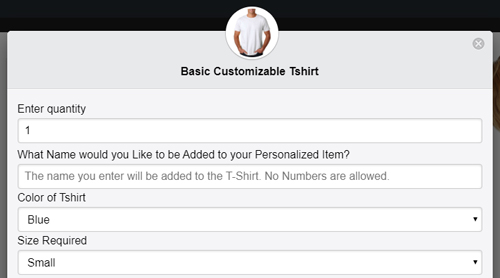
Step 9) View a product where you have enabled the custom fields option. The screenshot below demonstrates 2 different custom fields. The first field is a ‘Text Fields’ while the second and third fields are ‘Dropdown Fields’:
2) Enabling/Disabling Your Custom Fields on a Per Product Basis
By default, if you have marked the Additional Custom Fields checkbox, these fields will show up beneath each of your products. Within each of your products you can choose to disable the Additional Custom Fields if it does not make sense for them to be shown.

- Click the Products menu under Stripe Payments.
- Click on the product where you wish to Disable the Custom Fields.
- Scroll towards the bottom of the product page. You will see a section titled Custom Field.
- By default, the Use Global Setting checkbox will be marked.
- To disable the custom fields for this product, mark the Disable checkbox.
- Click the Update button to ensure the changes you have made are saved.
- View your product. You will notice no custom fields are displayed.
3) Viewing Your Customer’s Custom Field Data
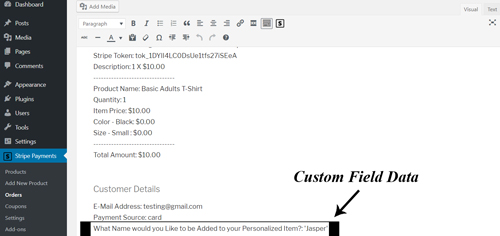
If a customer successfully purchases one of your products that has custom fields enabled, you can view their responses by clicking on the Stripe Payments Orders menu.
Click on the Title of the order and you will see information about the customer but also their response/s to your custom field/s.
Viewing the Custom Fields Data in Your Stripe Account
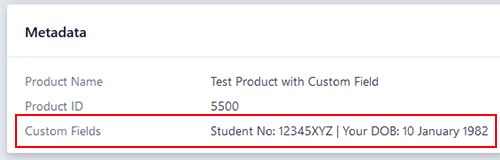
You can also view the custom fields in your Stripe account by going to the payments menu. Click on a payment and then scroll down to the “Metadata” section to view the custom fields.
Adding Custom Fields Data to the Email and Thank You page
You can use the following merge tag/shortcode to add the custom fields data from the transaction to the “sale notification email” or “thank you” page.
{custom_field}
You can also use following email merge tags to show the individual custom field name and value in the notification email:
{custom_field_N}
{custom_field_name_N}
{custom_field_value_N}
N is the ID of custom field you want to display. You can get you field’s ID from the addon’s configuration page:

Let’s say you have a custom field named “Phone number” and it’s ID is 3. Your customer made a purchase and entered “1234567890” as his/her phone number. This is how you can use email merge tags to put this data in your customer’s sale notification email:
{custom_field_3} – display field name and value. Customer will see following in the email:
Phone number: 1234567890
{custom_field_name_3} – display custom field name only. It would be “Phone number” in our case.
{custom_field_value_3} – display custom field value only: It would be “1234567890”.
Please note this functionality requires Additional Custom Fields addon 1.0.3+
Reorder or Rearrange the Custom Fields
To rearrange the order of your custom fields, go to the settings interface where you configure them. Then, use the arrows located next to the delete icon to move the fields up or down as needed.
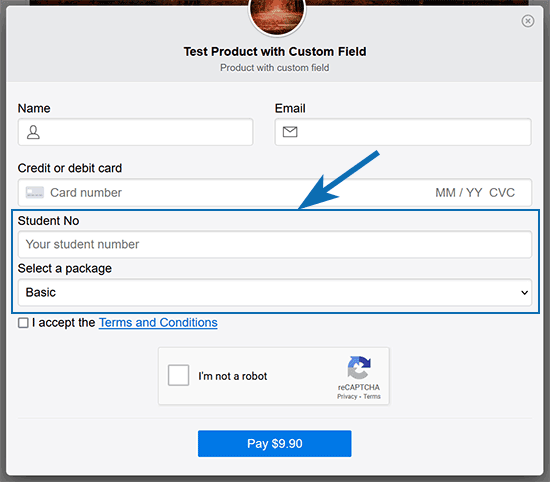
Configure Custom Fields Display Below Card Input Section
Within the extension’s settings menu, you have the option to position custom fields below the card input fields. When activated, custom fields will appear below the card input section, as illustrated in the screenshot below.
FAQ’s for the Stripe Payments Additional Custom Fields Addon
Q: Can you Add HTML in the Description Field?
A: Yes.
Q: What will Happen if my Customer Clicks the Buy Now Button without Filling out a Required Field?
A: The customer will not be able to purchase the product if they have not entered information for all fields that are required by admin. They will be asked the following below the required field: “Please fill in this field before proceeding.”
Q: How many Custom Fields can be Created?
A: Admin can create as many custom fields as they would like.
Q: Can You alter the Order the Custom Fields are Displayed in?
A: Yes you can use the up and down arrows in the custom fields tab to choose how the fields should be displayed.
Q: Can I Create a Different Set of Custom Fields for Different Products?
A: Yes. You can edit a product and then choose to show all the custom fields or selectively show some of the custom fields for that product.
Q: Can I use a Date Picker type field?
A: Yes, there is a “Datepicker” type field that allows your customers to pick a date from a calendar.
Purchase the Stripe Payments Additional Custom Fields Addon

This is a one-time payment (includes 1 year of support and updates).
Or Get the Addons Bundle
Get access to all our premium addons for the Stripe Payments Plugin, auto-updates and guaranteed support.
Click on the following banner to learn more.