The Stripe Payments Plugin offers an Additional Payment Methods addon that enables you to accept Klarna payments on your website.
In this tutorial, I’ll walk you through how to set up the addon so you can start accepting payments via Klarna using the Stripe Payments Plugin.
Table of Contents
Accepting Klarna Pay on Your Website
Step 1) Enable Klarna in Your Stripe Account
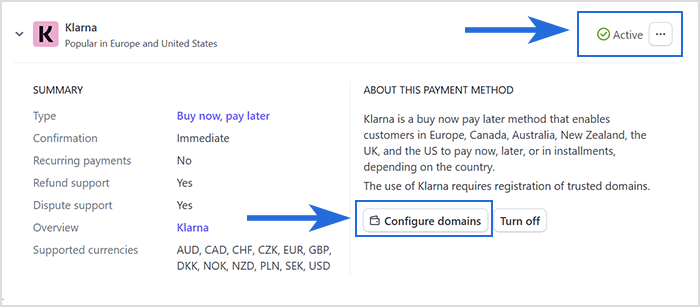
Log into your Stripe account dashboard and navigate to the ‘Payment methods’ settings interface.
Scroll down to the Klarna section, enable it, and configure your website domain as required.
Refer to the screenshot below for an example.
Step 2) Enable Klarna in the Settings Menu of the Addon
Navigate to the Klarna settings section within the Stripe Payments Plugin settings. Then check the ‘Enable Klarna’ checkbox.

Step 3) Verify Supported Currencies and Countries
Ensure the following requirements are met:
Supported Currencies
Klarna supports specific currencies, so you must configure the Stripe Payments Plugin to use one of the supported currencies for Klarna to function properly.
AUD, CAD, CHF, CZK, EUR, GBP, DKK, NOK, NZD, PLN, SEK, USD
Note: If your Stripe account is registered in an EEA country, customers can pay using supported EEA currencies. For accounts outside the EEA—such as those based in Australia—customers can only pay using the local currency (e.g., AUD). The same rule applies to other non-EEA countries.
See the full list of supported regions and currencies here: https://docs.stripe.com/payments/klarna
Supported Countries
Klarna is a buy now pay later method that supports customers from the following countries.
Europe, Canada, Australia, New Zealand, the UK, and the US
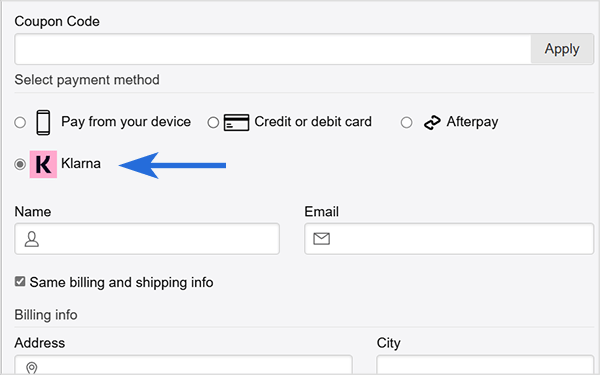
Customer Address Requirement
Klarna requires the customer’s address. If address collection is not already enabled in the product configuration, it will be automatically enforced when the customer selects Klarna as the payment option on the checkout form.
Front-End View of the Klarna Checkout Experience
When customers select ‘Klarna’ as the payment option, they will see a checkout interface similar to the example shown below.