Once you have created a product you may want to run a transaction to ensure everything is working correctly. The Stripe Payments Plugin comes with a feature that enables you to run a test mode transaction using your test Stripe keys.
Follow this documentation if you would like to complete a test transaction of any products or services created using the Stripe Payments plugin.
Table of Contents
- Step 1) Locating Your Test Stripe Keys
- Step 2) Configuring General Settings
- Step 3) Completing a Test Transaction
- Test Credit Cards for Test Mode Transactions
- Force Test Mode for Specific Products
- Testing 3D Secure Authentication Transaction Flow
- Troubleshooting 3D Secure Transaction Issues
Step 1) Locating Your Test Stripe Keys
To run a test transaction you will first need to locate and copy your stripe test API keys. These can be found in your Stripe account.
- Log in to your Stripe account.
- Click on the API menu (the API menu can be found towards the bottom left-hand-side).
- You will see a section for test data. There will be two keys: Your account’s ‘Publishable Key’ and the ‘Secret Key’.

Step 2) Configuring General Settings
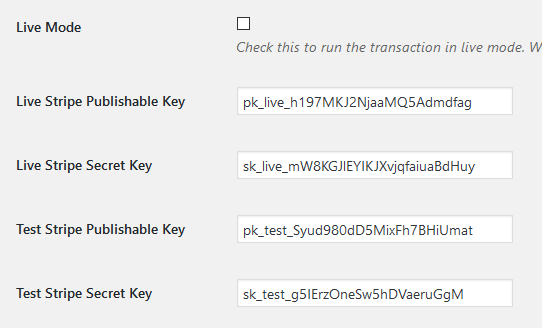
Now that you have located your test API keys in your Stripe account, you will need to copy and paste these into the settings of your Stripe Payments Plugin.
- In your admin dashboard, click on the settings tab under the Stripe Payments menu.
- Once you are in General Settings, scroll towards the bottom. You will see a section titled ‘Credentials’.
- Ensure you are running your site in test mode. The box next to ‘Live Mode’ should be left unchecked to do test mode transactions.
- Copy your test Stripe Publishable Key from your account and paste it into the Test Stripe Publishable Key field.
- Complete the same for your Test Stripe Secret Key. Copy it from your Stripe account and paste it into the required fields in the settings menu. Ensure you paste the secret key and publishable key into the correct fields.
- Save the changes you have made. You will now be able to complete a test transaction on your website.

Step 3) Completing a Test Transaction
Using a product you have created and published, you can complete a test transaction. This can be useful if you would like to ensure that the transactions are working successfully before you open your site for real life customer payments.
- Click the ‘Buy Now’ for a product available on your website.
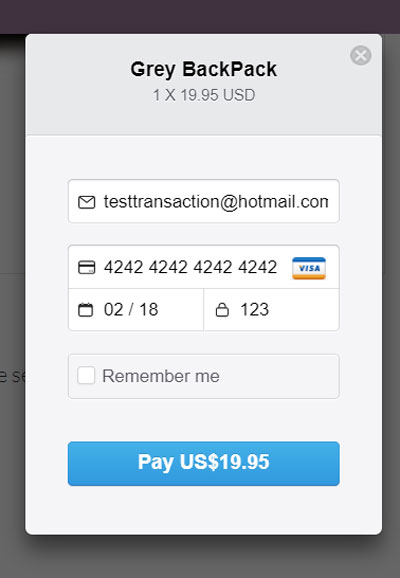
- Once you click the payment button, the Stripe popup will appear.
- In the Stripe popup you will need to enter in an email address.
- The card number you will need to use for testing purposes is: 4242 4242 4242 4242
- The expiry date of your card can be any date in the future. The date is the month, followed by the year. If today is the 01/18, your expiry for a test transaction can be 02/18.
- The CVC will always be ‘123’ for a test transaction.
- Click the ‘Pay’ button as you would if you were a real customer.
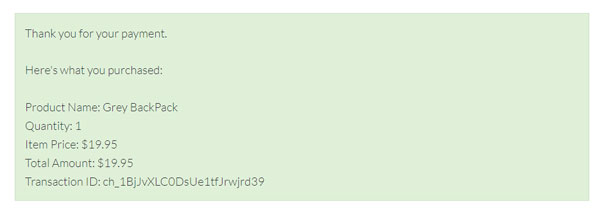
- You have now completed a test transaction on your website. You will be redirected to the successful payment results page.
For Testing Purposes:
Card Number: 4242 4242 4242 4242
Expiry Date: Any future date – month/year
CVC: 123


Test Credit Cards for Test Mode Transactions
The following video explains the Stripe test credit cards that you can use to test a transaction in test mode.
Force Test Mode for Specific Products
If you create certain products that you will only ever use for testing purposes, you can enable a ‘force test mode‘ feature which ensures that this product will always run in test mode even if live mode has been chosen within the Stripe Payments > General Settings menu.
The ‘Force Test Mode‘ feature can be enabled on a per product basis:
- Locate the product you wish to make specifically a ‘testing product‘ from the Stripe Payments > Products menu.
- Under the ‘Advanced Settings‘ area mark the ‘Force Test Mode‘ checkbox.
- Update the product to implement this change.

This product will always run in test mode now. Live transactions will not be a possibility with this product while the ‘Force Test Mode‘ feature is enabled even if you have globally enabled ‘Live Mode‘. You can disable the test mode feature for a product at anytime by de-selecting the checkbox.
Testing 3D Secure Authentication Transaction Flow
Stripe initiates authentication either when required by regulations or when triggered by your Radar rules or custom code. However, authentication may not always succeed – for instance, if the customer’s card isn’t enrolled in 3D Secure, or if an error occurs during the process. Use the test cards provided below to simulate various scenarios and ensure your site handles them correctly.
3D Secure Success Scenario
Simulate a successful 3D Secure authentication by performing a test transaction with the following card. When prompted by Stripe, select the Complete button:
Card Number: 4000000000003220
3D Secure Declined Scenario
Simulate a failed 3D Secure authentication by performing a test transaction with the following card. When prompted by Stripe, select the Fail button:
Card Number: 4000008400001629
3D Secure Error Scenario
Simulate a 3D Secure error by performing a test transaction with the following card:
Card Number: 4000008400001280
Troubleshooting 3D Secure Transaction Issues
3D Secure transactions may fail due to conflicts on your site. These conflicts can arise from the combination of plugins or themes in use. To address this issue, follow the steps below and test again to see if this resolves the problem:
- Navigate to the “Advanced Settings” menu in the Accept Stripe Payments plugin.
- Scroll to the bottom of the page, enable (tick) the “Disable 3D Secure Iframe” option, and save the settings.
Note: Disabling the 3D Secure iframe may resolve issues caused by iframe conflicts on your site.