The Stripe Payments Plugin offers an Additional Payment Methods addon that enables your to accept Apple Pay transactions on your website. Successful transactions will then be shown in your Stripe account.
In this tutorial I will show you how to setup the addon so you can accept Apple Pay on your WordPress site.
Table of Contents
- Accepting Apple Pay on Your Website
- How will my Customers Checkout Using Apple Pay?
- Troubleshooting
- FAQ’s
Accepting Apple Pay on Your Website
Once you have enabled this payment option and verified your domain in your Stripe account, customers who are accessing your website from their Apple device (on Safari browser) will be given the option to checkout with Apple Pay.
You need to do the following setup to accept Apple Pay with the Stripe payments plugin:
- Ensure you have enabled the option in your Additional Payment Methods addon settings.
- Verify your domain in your Stripe merchant account’s Apple Pay settings.
Step 1) Enable Apple Pay in the Settings Menu of the Addon
- Click on the ‘Settings’ menu of the ‘Stripe Payments’ plugin.
- Under the ‘Additional Payment Methods’ tab is where you will find all the fields that you can customize for this addon.
- Ensure the Additional Payment Methods box is checked. This will enable you to accept both ‘Apple Pay’ and ‘Pay with Google’.

Step 2) Verifying Your Domain for Apple Pay in Your Stripe Account
Before your customers can checkout with Apple Pay, you will need to verify your domain in your Stripe account.
- Login to your Stripe account. Click on the ‘Apple Pay’ menu which can be found by clicking on ‘Settings’. The Apple Pay option can be found under the Payments and Payouts section.
- Accept the terms and conditions. You need to accept the Apple Pay terms and conditions before you can go ahead with the setup.
- Next, go to the addon’s settings menu (the “Additional Payment Methods” tab) and click on the Autoapprove Domain button. You will see a success message if the addon can successfully approve this domain for Apple Pay.

The plugin is now setup to start accepting apple pay on your site.
How will my Customers Checkout Using Apple Pay?
All customers viewing your products from an Apple device (for example, an iPhone) will be given the Apple Pay option.
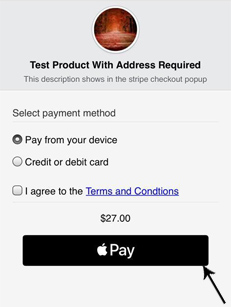
Once your customers are on a product’s page and they click the payment button the Apple Pay option will appear on the popup under the ‘Pay Using Your Device’ checkbox. Your customers who are using Safari browser on an Apple device can then proceed to checkout using Apple Pay.
Note: Apple only allows Apple Pay in their Safari browser (on an Apple Device).

Troubleshooting
Minimum Requirements
Apple is very strict as to how the Apple pay feature works. So make sure all the following conditions are met:
- To use Apple Pay, the customer must be using an Apple Device and the Safari browser. If you are using a non-safari browser then the Apple pay option won’t show up there.
- The Apple device must have the Wallet and Apple Pay option setup correctly in the device settings.
- Your website must be using an SSL certificate. So the webpage containing the payment button needs to be using a secure “HTTPS” URL.
FAQ’s
Q. Which device can my customers use for Apple Pay?
A. Customers using any iPhone or iPad will be able to checkout using the Apple Pay option as long as they have enabled apple payment option in their devices.
Q. Where can I get the Additional Payment Methods Addon?
A. You can get the addon from this page.