You have run into a transaction related issue on your site when using the Stripe Payments Plugin. Prior to posting in the forum or emailing our support team, there is a simple yet helpful feature that you can enable to get a better understanding of what is going on.
In the following documentation we will outline What a Debug Log Is, When to Use a Debug Log and How a Debug Log Can Help You Fix an Issue.

What is a Debug Log?
When a debug log has been enabled it works to record database operations and processes occurring on your website. In terms of an eCommerce plugin, the information logged is generally all the actions that occur post payment. Each step will be recorded and those that fail to do what is intended will be marked as ‘Failure’. Those marked as ‘Failure’ give admin ideas about why the post payment process is incomplete.
Below you will find the debug log of a Successful Stripe Payments product purchase:

Below is a debug log where one aspect of the process has Failed. The words FAILURE highlight which part of the process is failing.

When Should a Debug Log be Used?
A debug log should be enabled if a function of the plugin is not working as it should be. For instance, the ‘success’ email may not be making it to your customers. Enabling the debug log gives you something to work off to fix an issue occurring on your website. If you see that the emails are being sent from your site although are still not making it to the customer you can ensure that the issue is not site related.
The debug log can also be used to identify why a Stripe Payments Addon isn’t working correctly.
How Can a Debug Log Help to Solve an Issue?
A debug log outlines which step of the payment process has failed. This gives admin/support staff an idea of what is going wrong and in turn some idea on how the issue can be fixed. Debug logs can be helpful if you are having email sending issues or payment processing issues on your site.
Debug Log for the Stripe Payments Plugin – How to Enable the Debug Log
The Stripe Payments Plugin comes with it’s own debug log that can be enabled or disabled by admin. When enabled, this log works to record all processes that are being completed by the plugin. For instance, if a customer comes to your site and purchases a product created with the Stripe Payments Plugin, the log will show when the transaction was completed and if the email was successfully sent to the customer.
Locating the Stripe Payments Debug Log
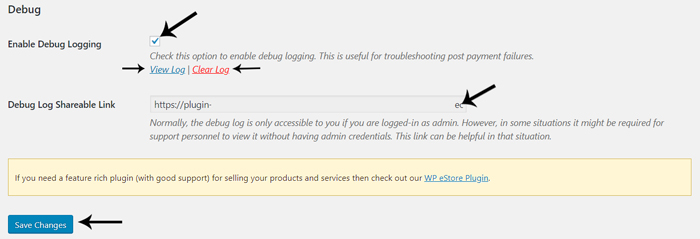
The Debug Log can be found under the Stripe Payments ‘Settings’ menu. Under the section titled ‘Debug’ you will see a checkbox that you will need to mark to enable the log.
To view your debug log you can click on the View Log. If you are wishing to clear your log and start fresh, click the Clear Log button. It is always a good idea to clear your debug log before testing out an issue on your site. This way you can ensure any information recorded on the log relates to the testing you are completing.
If you are communicating with support staff and they wish to view your debug log, you can simply copy and paste the Debug Log Shareable Link. This allows support staff to view your debug log without needing to log into your site.

Viewing the Debug Log to Solve an Issue
After you have completed a test transaction to solve an issue on your site, click the View Log to gather more answers about what is going wrong. Scan your debug log for the word ‘Failure’. This will indicate what action is failing on your website. Read the line to work out what adjustments must be made to correct the issue. Often the reason a process is failing is due to one small setup error that can be easily fixed.
After you have completed troubleshooting you may like to disable your debug log or clear the log.